I recently had the privilege of joining several other outstanding gardeners from all over the country, in Dekalb, Illinois at Proven Winners’ headquarters, to learn more about America’s most trusted plant brand. Now, I’m sharing with you how the 2022 Proven Winners’ Creators Roundtable went down, and some things you probably didn’t already know about Proven Winners - #1 Plant Brand.
Read MoreGarden
Soil Testing: How bad IS this red compacted clay?
Heather at HereSheGrows made me do it—and you should too!
After procrastinating for the last couple years, I finally bit the bullet and sent in some soil samples from my garden for soil testing. We were blessed, at our last house, with very well-draining, dark, sandy-silty soil. Everything grew like gangbusters and soil testing just seemed like a waste of time and effort. If it ain’t broke, why fix it?!
Imagine my dismay, when I stuck my shovel down in the earth here, to turn up a mass of wet red clay. I had just listened to a soil scientist on a podcast talking about the incredibly fertile red soils of Georgia, looked around at the surrounding farm fields in my new area, and tried to look on the bright side. Maybe there’s something to this red dirt?! Maybe it's incredibly productive and high in iron?! Sure, I amended it with bagged manures, composts, and the like, and we brought in a whole truckload of composted manure for the vegetable garden area. But after noticing year two of chlorosis, blossom end rot, and some other leaf distortions, I decided to quit guessing about whether this dirt is just very alkaline, and get it tested.
I looked up the testing information through our local university system, and they recommended going through Colorado State University. CSU had testing wait times of over 30 days, however, and I didn’t feel like being that patient. So I went over to HereSheGrows, where my friend Heather recently sent off soil samples for testing, and decided to utilize the laboratory that she used—A&L Great Lakes Lab.
Sending off Soil Samples for Testing
A&L Great Lakes Laboratories offers a wide range of soil testing services, but their “Lawn and Garden Analysis” is geared more toward the home gardener. You simply fill out the Submittal Form on their website, collect and label your samples, and mail them in. If you provide an email address, you can get your test results even faster!
I decided to test the soil in two areas of my yard. I wanted to get a Complete soil test in the vegetable garden, which cost $30, because I have definitely invested much more in the soil in that area. I have also heard from a friend in the University of Wyoming Master Gardener program that Wyoming soils tend to be high in salt, and so I felt the extra $10 was worth finding out whether this was the case in my area, as well. I decided to get just a Basic soil test, which cost $20, on the perennial bed in the backyard. I was hoping that these two locations could give me a pretty good picture of what I’m working with.
To take my samples, I simply used my hand trowel to scoop out plugs of my native dirt. The idea is to get a core sample, down to a depth of 6-8 inches, as best as you can, without using any special equipment. For each area that I was testing, I would take four core samples, that ended up being plugs that were about 2-3 inches in diameter and 6 inches deep. Then, I mixed all the plugs on a tray, and let them dry up some so the shipping weight wouldn’t be so heavy.
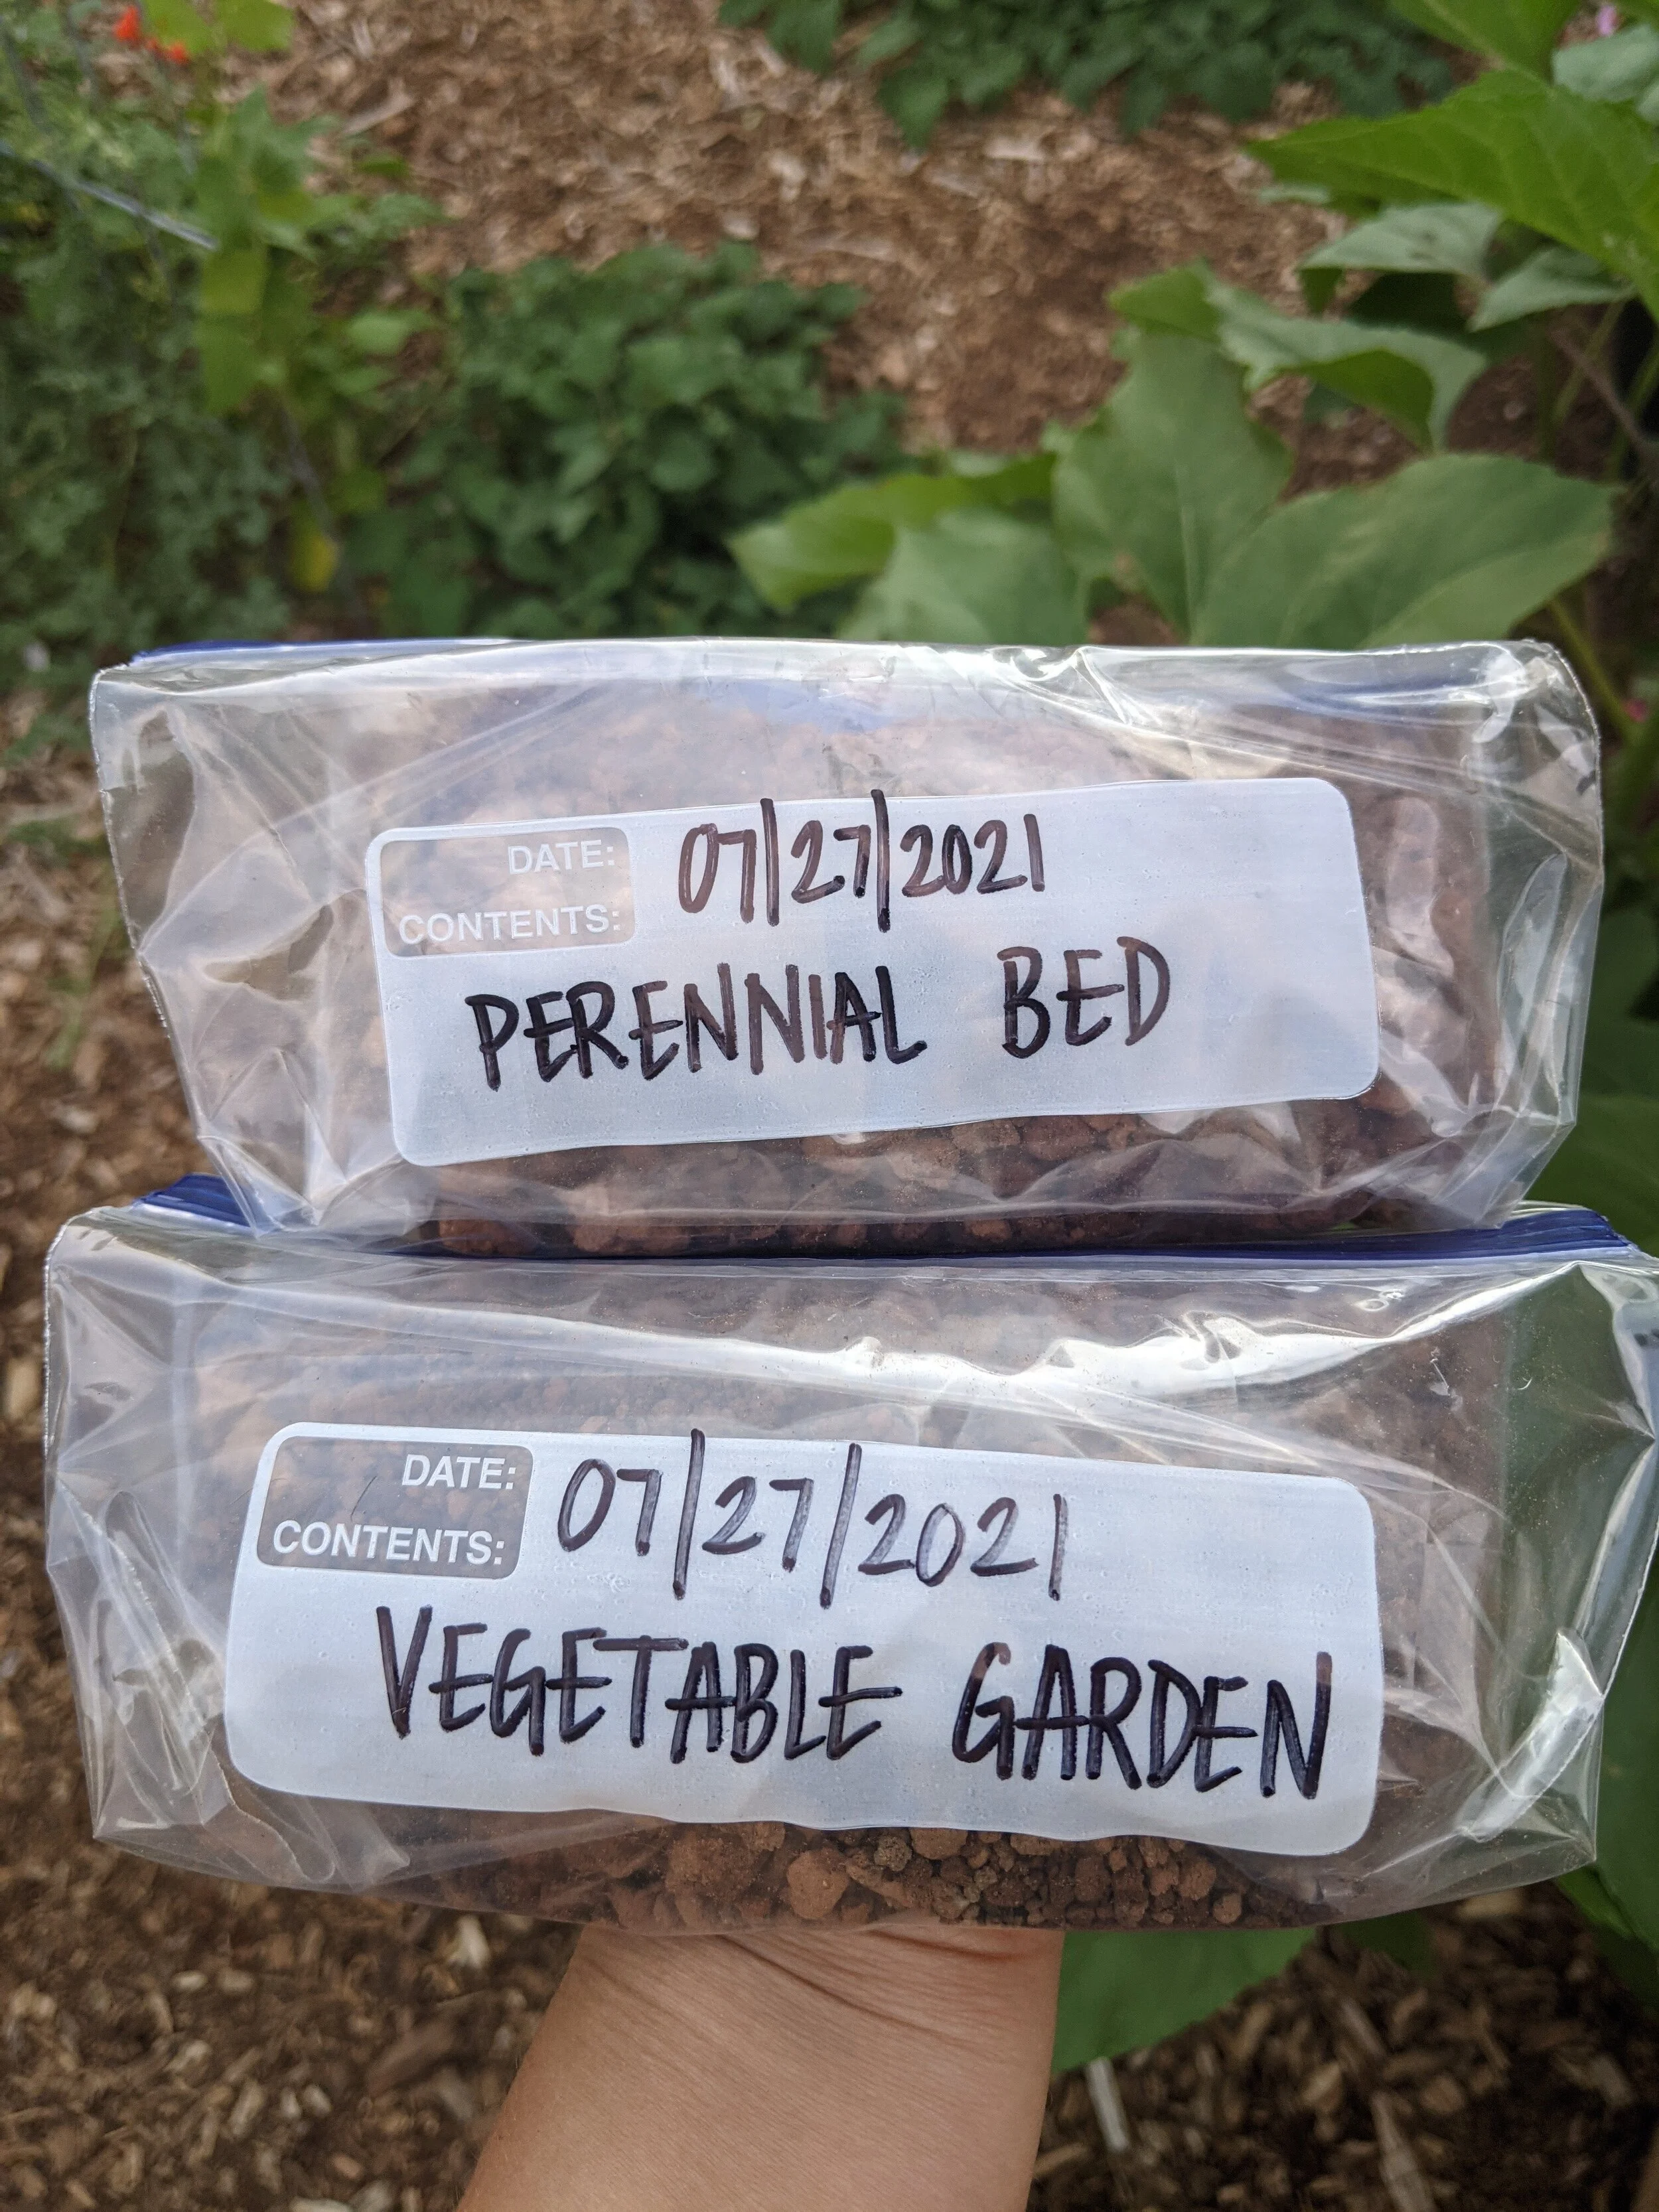
I labeled my two Ziplock bags with the date and name of the area I was testing, and put a heaping cupful of the sampled soil into their respective bags. I boxed up my samples, with the completed Submittal Form and a check for $50, and sent them on their way.
If you would like confirmation of when your samples are received and quicker test results, be sure to include your email address on the Submittal Form! The lab sent me an email of receipt on Friday, and by the following Tuesday, I had an email with all of my results. I am sure testing times vary widely, especially depending on the time of year, but I was very pleased with such a speedy turnaround time!
The Verdict is In
As suspected, my soil is very alkaline!
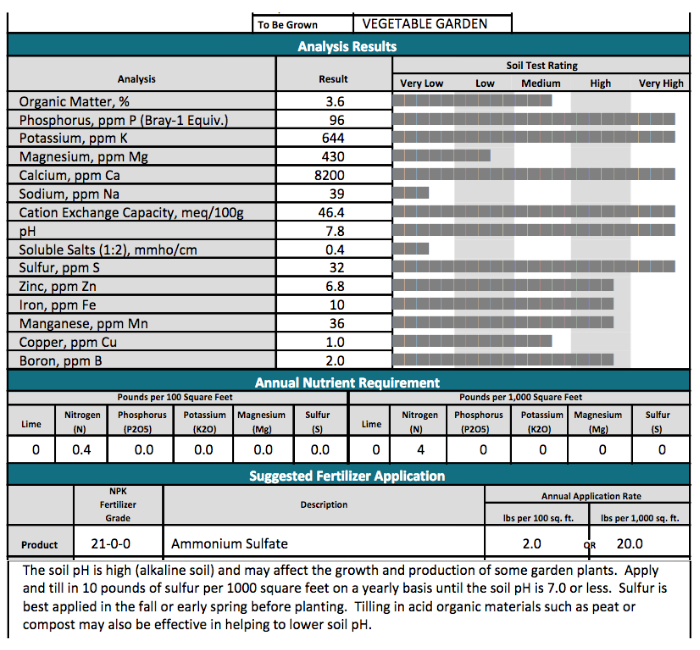
We live in the west, so this makes sense, but I did not anticipate how high the pH would truly measure. The sample from the backyard perennial bed had a pH of 8.1! The sample from the vegetable garden had a pH of 7.8. Although plants are very adaptable, most prefer to grow at a pH between about 6.0 and 7.0. So basically (no pun intended), the soil is very basic!
On the flip side, the soil was not deficient in any key nutrients. In fact, it was High in many, including Calcium, Iron, Potassium, and Phosphorous. This could be partly because the soil has a high Cation Exchange Capacity—or ability to “hold” onto things! Many clay soils have a high Cation Exchange Capacity because they have a lot of surface area. You can take a cup of sand and a cup of clay, and the clay will hold onto many more ions and molecules, simply because there are so many more fine particles of clay in the same volume, than there are of sand. With that said, the soil is holding onto the necessary nutrients, there are just issues of bio-availability of said nutrients to the plants. Therefore, the chlorosis isn’t being caused by a true lack of iron—rather, the high pH is preventing the iron from being made available to the plants. Also, the blossom end rot in the tomatoes isn’t being caused by a true lack of Calcium—rather, the high pH is binding up the calcium in the soil, and preventing it from being taken up by the tomato plants. Truthfully, a deficiency in one nutrient or another would have been easier for me to treat, but at least, now I have answers and can move forward in making improvements.
The lab provided suggestions for how I can work to lower the pH, by utilizing Ammonium sulfate fertilizer, elemental sulfur, and compost/peat moss. I’m not certain I will use the exact fertilizer they recommended, especially in the vegetable garden, as I try to keep things as organic as possible. I will, however be amending the soil well this fall, and applying sulfur per their recommendations.
Salt is not an issue
Luckily for me and contrary to what my friend in the master gardener program told me, my soil is not high in soluble salts, so salinity is not an issue. This is good to hear, because we have heavy, compacted clay, and I think Gypsum could help. Up until now, have been hesitant to use gypsum because I have been told that it can increase soil salinity.
I asked Espoma for Organic Recommendations
Out of curiosity, I reached out to Espoma, makers of the TomatoTone, HollyTone, BulbTone, BioTone Starter, and IronTone that I have been using for years, to see if they could give me some suggestions based on my soil test results. Here is what they recommended:
I’ve already got a 30 pound bag of Soil Acidifier on it’s way. Interestingly, it includes sulfur and gypsum, both of which may tag team over time, to improve both pH and soil texture.
This is just the Start
Improving soil is a continuous process, but now that my soil test results are here, I feel confident in moving forward with amendments. As I have mentioned, we have heavy clay that is prone to compaction. So more than just issues with soil chemistry, in the form of high pH, the soil also has some physiological shortcomings when it comes to texture and drainage.
We had a wet spring this year, and it revealed definite issues with drainage. For example, Hardy Hibiscus plants are touted as great “bog plants" and the drainage was so lacking in areas, that I outright lost a couple hardy hibiscuses. They started greening up, I saw eyes forming, and then, when they didn’t emerge, I dug down in the mucky soil to find rotted, squishy roots. So disappointing! I also lost several other plants. Heucheras showed new growth and then just died; I found them with soggy roots. A few tomato plants started yellowing and getting blistered stems, before basically loosing all of their leaves and dying. A new honeysuckle plant sat in wet clay mud and died. And so on and so forth. I had none of this loss last year, but then again, it wasn’t so wet. Moving forward, this issue with drainage needs to be addressed.
A local veteran gardener that I am in regular touch with suggested I do something quite unconventional and out of the norm to improve the compacted clay. I practice deep mulching utilizing arborist wood chips in the vegetable garden, and have for years. The idea is that as this top dressing breaks down, it will eventually get turned into the soil and improve the overall consistency over the years. At the same time, it helps massively with weed supression. I need something less superficial, however, than just back to eden gardening practices. She suggested that I used a bulb planting auger and my drill, to dig several holes throughout the garden this Fall, and backfill them with a some sort of alfalfa pellets or food scraps. The idea being that worms will channel through the dense soil to get to these columns of “food”, oxygenating the soil along the way and enriching it with their litter. I am totally open to trying this idea, and plan on pursuing it utilizing a combination of peat moss and alfalfa pellets—both of which are acidifying.
The other alternative we have considered is tilling under the wood chips that have been breaking down on top of the soil for the last two years. I am hesitant, however, because I would hate to destroy the mycelium that has been developing over time, and worry about any nitrogen robbing or other ill-effects that might result.
And so, there you have it—I finally got my soil tested. The process ended up being quick and painless. I was able to take the samples myself and I got my results lightning fast. I was able to use the results to come up with a game plan to make improvements. Have you got your soil tested? What’s holding you back?
Grow Perennials from Seed--No Cold Stratification Needed!
I have been experimenting with growing perennial plants from seed for the last few years. Some of my experiments have grown into beautiful plants, and I gave up on some before they ever germinated. Why did I give up? Because sometimes, perennials take several months to germinate and demand more patience than I am willing to give them.
Many perennial seeds require a period of cold stratification in order to sprout. Basically, in nature, these seeds have to go through winter without rotting in moist conditions or sprouting prematurely and being zapped by frost. Therefore, the seeds have been engineered to undergo a period of cold/moist conditions, before they will germinate. To simulate cold stratification, there are a few things that can be done—namely, chilling seeds in a refrigerator, direct sowing in fall, and or winter sowing. I have done the back of the refrigerator for weeks at a time thing. I have also done the freezer-to-fridge-and-back seed shuffle (or “Speed Dial” method) to try and meet the cold requirements. But mostly, when it comes to starting perennials, I have found winter-sowing to be more my speed. With winter sowing, you sow seeds in mini milk jug greenhouses in like January, and stick them outside. Make sure they don’t dry out on those unseasonably warm early spring days, and normally, after a few months of undergoing the freeze-thaw cycle, the seeds will be sufficiently cold-stratified and sprout. If my milk jugs don’t sprout by May, I usually call it a loss and determine that those seeds were not meant to be. On occasion, I have moved them into the cushy atmosphere of my grow lights and given them just a bit longer. Overall, I don’t like having to cold stratify seeds, though. Aside from choosing to grow perennials from seed that do not require cold-stratification, I have recently discovered another way to avoid the whole process of subjecting seeds to some sort of cold treatment, and I’m all about it!
Today, I am going to share with you, how you can grow awesome perennial plants from seed—no cold stratification necessary!
The answer: Jelitto’s Gold Nugget Seed®
First, a bit about Jelitto Seeds…
There are so many reputable seed companies nowadays, each carrying a unique line-up of varieties. I am sure you are familiar with Burpee and Ferry-Morse, the go-to’s found in most big box stores. If you shop for seed online, there are also many incredible vendors, such as Renee’s Garden Seeds, Botanical Interests, Johnny’s, Pinetree Seeds, and Baker Creek, just to name a few! While almost all of these vendors sell a selection of perennials, it is usually somewhat limited. Enter Jelitto Seeds.
Jelitto Seeds is a wholesale perennial seed supplier. Often times, they are who provides the perennial seeds that these online vendors we are familiar with, turn around and sell to us. Have you ever noticed images on a particular seed shop with “Jelitto” watermarks? I remember when ‘Green Twister’ coneflowers came out a couple years ago, and practically every site that was carrying them in their “NEW for this Year” section, had the same photo of them, with a “Jelitto” watermark. I have also seen those familiar watermarks on many seeds sold on Swallowtail Garden Seeds and from independent sellers on Etsy.
So it was really a no brainer when I decided to Google “Jelitto seed”. I found out from others on DavesGarden Garden Watchdog list, that people have been ordering seed directly from Jelitto for years. And when I started scanning the catalog of varieties offered from Jelitto, I realized they had thousands of things I had never even heard of!
Here’s a few more things about Jelitto Seed:
Jelitto Seeds is headquartered in Germany, but they have an office in Kentucky.
The seeds ship from Germany to Kentucky, going through all the correct U.S. Customs processes along the way, before being sent to you. In other words, ordering from Jelitto is completely legal.
Jelitto is a reputable supplier, with over 60 years experience in the horticultural industry.
Jelitto specializes in perennials, but their catalog does have a few annual and herb offerings.
Jelitto has introduced many seed cultivars to market as a result of their breeding efforts.
Those ‘Green Twister’ coneflowers I mentioned earlier—a Jelitto cultivar! Others that come to mind: ‘Bleeding Hearts’ Heliopsis, ‘Tango’ Agastache, ‘Magnus’ ‘Ruby Star’ & ‘Mellow Yellow’ Echinaceas, and ‘Little Goldstar’ Rudbeckia'.
Click HERE to see a complete compilation of Jelitto Introductions
Jelitto is on the cutting edge of seed technology, and offers two line-ups of seed that has been pre-treated, for ease of sowing and optimal germination:
What is Gold Nugget Seed®?
I discovered Gold Nugget pre-treated seeds from Jelitto, and I’m not looking back! Jelitto uses proprietary processes to pre-treat these seeds, that would normally need to undergo cold treatment in order to sprout. In other words:
Gold Nugget Seed® does not need to be cold-stratified, and can be sown as is.
When you get Gold Nugget Seed®, you can sow them like you would sow any regular seed that doesn’t require cold treatment—it’s like starting a tomato seed! I still recommend paying close attention to whether a particular variety needs light or dark to germinate, but basically, you sow the Gold Nugget Seeds, and they sprout within just a couple weeks.
Gold Nugget Seed is definitely what wholesale perennial growers, who grow from seed rather than tissue cultures, are utilizing. In my most recent purchase, I ordered several varieties including a few natives from the Gold Nugget lineup—Violas, Iron Weed, Joe Pye Weed, Butterfly Weed, and Scarlet Lobelia.
The one downside to Gold Nugget Seed, is that it does not store as well as untreated seed. I would recommend waiting until you are close to starting seeds before ordering, and then ordering only what you need. For a home gardener like me, this often means ordering the smallest packet as possible from Jelitto. I forgot to mention earlier—you can order anywhere from just a packet of seed to a vast quantity.
Honestly, the Gold Nugget Seed® makes starting seeds that usually require cold treatment vastly easier! However, their catalog has so much more to offer than just Gold Nugget Seed®. I have bought and successfully started countless other perennial varieties from them, that have not been pre-treated in any way.
Ordering from Jelitto
Shipping Times Require Patience
When placing an order from Jelitto, it is important to note that, because they are headquartered in Germany, your seed will be shipping from Germany. Therefore, you must be especially patient when waiting for your seed to arrive. Expect to wait at least 4 weeks to get your shipment of seeds in. During busy times, it may take even longer. I think it just varies with the season, though, because I placed an order back in June and was pleasantly surprised to receive it in about 3 weeks.
All Currency is Shown in Euros
Once again, Jelitto is based out of Germany. They gladly ship to the United States, but when you order through the website, the prices shown are all in Euros rather than U.S. Dollars. It might be helpful to open up Google in a separate tab and type in 1 Euro to US Dollars. This will bring up the current exchange rates and give you a box that you can use to convert the total euros in your Jelitto shopping cart to dollars.
A Login is Necessary
In order to add items to your shopping cart or wish list, and place an order, you will need to create an account. There is no “Continue as a Guest” option.
Shipping is Not Very Expensive
Jelitto charges you separate fees for packing, insurance, and postage, but the shipping rates are really very reasonable—especially coming all the way from Europe. To give you an idea, my last order ended up being just shy of $60 worth of seed; the shipping cost (packing + insurance + postage) was less than $8. Totally reasonable in my humble opinion, especially given what many U.S. based vendors charge for seed shipping. This same amount of seed would have cost $12.95 to ship from Burpee, and truly, it would probably all fit in a medium First Class Mail envelope and be less than $5 in postage.
Jelitto Seed Packets Do Not Have Much Information—Refer, Instead, to their Website
Jelitto seed packets are not geared towards the typical home gardener. As such, they have hardly any information. Instead, you should refer to their website for information about the variety you are planting and how to cultivate it. Their website has a “Decription” and “Cultivation” tab for each variety. The Description tab will include information about hardiness zones, sizing, and place of origin. I like referring to the place of origin, as I’m curious about which plants are native to the U.S. and sometimes, more specifically, the Midwest. The Cultivation tab will include information about seed counts (per gram) and sowing.
One last thing—I am NOT Sponsored by Jelitto
I feel it is worth mentioning that I am NOT sponsored, in any way, by Jelitto Seed. They don’t even know who I am. I am just a happy customer! I did a poll on my Instagram Story recently, and only like one person had even heard of Jelitto. That’s why I wanted to share them with you! As you can tell from what I said earlier, I am also totally sold on their lineup of Gold Nugget Seed®, and can just imagine the time I would have saved by starting some plants from it.
So, out of curiosity—until today, had you ever heard of Jelitto Seed? Have you ever purchased seed directly from them? If so, have you ever tried any of their Gold Nugget Seed®? I’d love to hear about your experience with Jelitto, in the comment section below!