
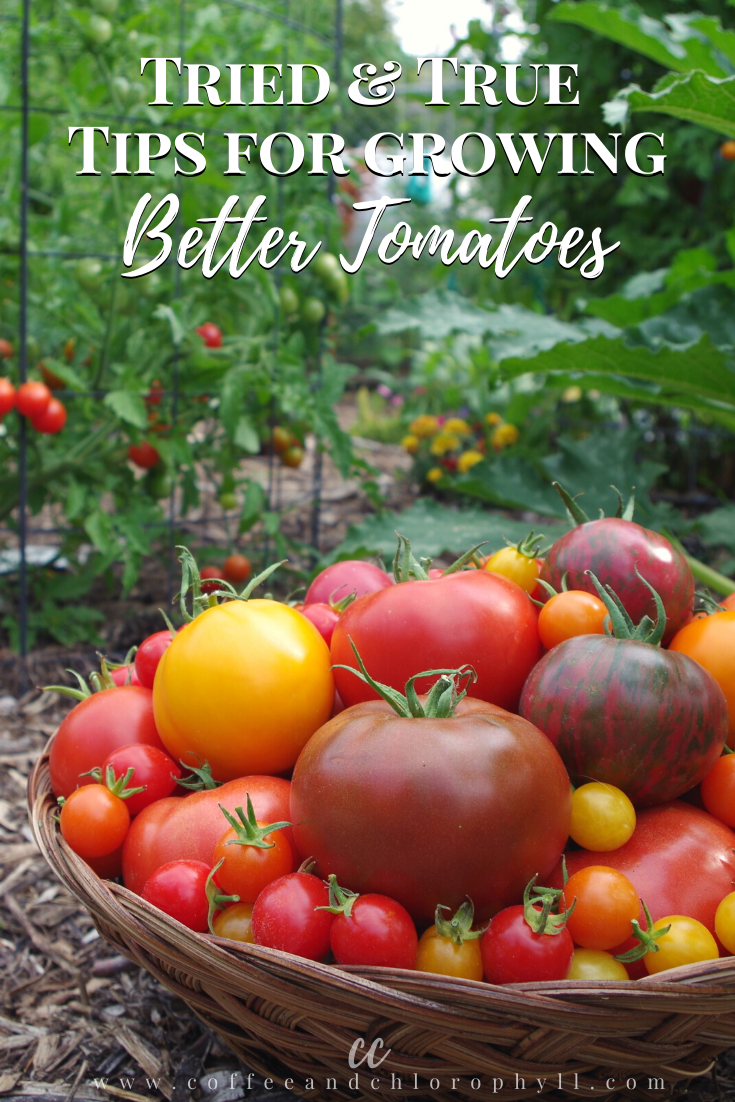
Tips & Tricks to Help You Grow Better Tomatoes
This winter, after eating a sliced store-bought tomato with salt and pepper, like we love to do with homegrown tomatoes, my sister told me, "I hate eating tomatoes from the store, now that we've had homegrown for so many summers! They are junk. Does that make me a tomato snob or a tomato connoisseur?!"
Hmmmm....definitely a connoisseur!
“Tomato Connoisseur (noun): a person with an exaggerated respect for tomatoes who follows the mantra—If it ain’t homegrown, it’s crap!”
It's no surprise that tomatoes are the Number One vegetable grown in summer gardens all over. They are juicy and delectable, and store-bought simply can't hold a candle to homegrown. Store-bought tomatoes taste like disappointment! Tomatoes are relatively easy to grow in your backyard. However, if you want the best, most flavorful tomatoes, that are the envy of all your neighbors, then you should take care to give your tomato plants a little extra love. Here are some of my tried and true tips to grow Big, Bold, Beautiful Tomatoes.
Tried & True Tips for Growing Better Tomatoes
Grow from seed
I find that my tomato plants grown from seed almost always perform better than nursery-bought transplants, but any tomato plant, is better than no plant at all, so if nursery starts are all you can get your hands on, then go for it!
As a beginner, I would purchase the already-started tomato plants from big box stores or my local nursery, and they certainly grew just fine. The plants were vigorous and produced lots of tomatoes. But, when I made the switch to growing my own tomato plants from seed a couple years later, I was amazed at the difference. Tomato plants grown from seed are healthier and more resilient than nursery transplants. Plus, when growing from seed, you have a much larger assortment of tomato varieties available. For example, my all-time favorite tomato in the whole wide world is Sun Gold. If I never started growing it from seed several years ago, I probably would have never discovered it because, to this day, I never see it at the big box stores in my area.
Comparing store-bought transplants to my homegrown seedlings
One year, I did an informal comparison between nursery transplants and my homegrown seedlings. I planted some starts I picked up from Home Depot—they were larger plants that were about a foot tall. At that same time, I transplanted out my little-bitty seedlings that were just a few inches tall and had only about 3 sets of true leaves. Within a couple weeks, my seedlings had not only caught up to the store-bought transplants, but they had actually surpassed them. I can only speculate why tomato seedlings grown from seed perform better than store-bought starts. I think it has to do with the care the plants receive while they are waiting to be sold. Lots of nurseries and stores over-water their veggie transplants, and drown them with fertilizer. They put on all this great top growth from the nitrogen in the fertilizer they are fed, but their root growth isn’t as superior. So it’s like you are bringing this plant home, that is addicted to fertilizer, plunking it in the ground, and then expecting it to thrive. Meanwhile, this plant has been living on a steady diet of high nitrogen fertilizer and constant water, and so it takes some time to adjust to actual garden conditions. Whereas seedlings grown at home, with significantly less supplemental fertilizer, if any, seem to have more extensive root systems, since they have to “tap” the soil for nutrients they are needing.
Choose your tomato varieties wisely
There are hundreds and thousands of tomato varieties available to you, in both hybrid and heirloom varieties. And contrary to popular myth, hybrids are not GMO’s! Each variety offers a unique set of traits. By doing your research and choosing your tomato varieties wisely, you can get tomatoes of any size, shape, color, flavor profile, or disease-resistance. I am placing a big emphasis here on tomatoes that have been bred to resist certain diseases. Resistant varieties can be particularly helpful if you have a disease that is prevalent in your region, or has taken out your past tomato crops. Many tomato seedling labels or seed packets, or seed catalogs, use a series of [capital] letters listed to designate Tomato Disease Resistance Codes, for any given variety. What each letter represents can sometimes vary depending, as some brands use proprietary coding, but for the most part, these are the Letters and their corresponding Disease Resistances:
Tomato Disease Resistance Codes
A - Alternaria Stem Canker, caused by fungus
F (FF, FFF) - Fusarium Wilt presenting in 3 different races, caused by fungus
V - Verticillium Wilt, caused by fungus
TSWV - Tomato Spotted Wilted Virus
N - Nematodes, or parasitic roundworms
T (TMV) - Tobacco Mosaic Virus
St - Stemphylium Gray Leaf Spot, caused by fungus
EB - Early Blight, caused by Alternaria fungus
LB - Late Blight, caused by Phytophthora infestans water mold
So if your tomatoes were his hard last year with Early Blight, then you should look for tomato varieties this year, that are resistant to Early Blight. For example, Juliet is a larger variety of red grape tomato, that is resistant to both early and late blight. Other varieties of Early Blight resistant tomatoes can be found HERE—Early Blight Resistant Tomato Varieties.
For a catalog of Disease Resistant Tomato Varieties, organized by Disease, check out Reimer Seeds—so convenient!
For a Spreadsheet containing other Disease Resistant Tomato Varieties, check out the Cornell University Vegetable MD Tables of Disease Resistant Varieties
Start ‘em early
I start all of my tomato plants from seed, indoors, under fluorescent lights. Out here in Wyoming, I start as early as February, or 12-14 weeks before our average last frost date This is an extreme head start, but with a growing season lasting, on average, less than 110 days, I need all the extra growing time I can get, if I want to harvest 1-2 pound heirloom whoppers before it starts snowing in September. Plus, by February, I’ve got such cabin fever and itchy green fingers, I can’t hold back any longer! Over time, I have dedicated indoor growing space for my tomato plants and developed a strategy for managing them in the last month when that are getting quite large and unruly.
You don’t have to start as early as me, though! In fact, I don’t recommend you start this early, unless you have substantial light space available, and are willing to purchase large enough containers and premium soil to support healthy growth.
When you start your tomatoes, should depend on your Average Last Frost Date. I’ve linked to the Old Farmer’s Almanac website. If you put in your zip code, it will provide you with the average last and first frost dates for your area. These dates are far more valuable in terms of vegetable and annual planting schedules, than USDA Hardiness Zones, because most vegetables and annuals aren’t going to be overwintered. Plus, you need to know these dates for your zip code because, even if you are in the same hardiness zone as another gardener, your first and last frost dates are likely to be different. I cannot stress this enough because I am constantly seeing gardeners on Instagram say, “If you are in Zone 7, now is the time to plant out your ____,” and this is really bad advice! Planting dates should revolve around frost dates, NOT hardiness zones!
Once you have your average last frost date, count back at least 8 weeks and that’s when you should start your tomatoes. If you live somewhere with a shorter growing season, like less than 4 months, I would recommend starting even earlier, if you have the time and space, especially if you are hoping to harvest some larger slicers and heirloom varieties, or anything very early. And if you live in a warmer zone, you might have to toss out these rules altogether! In California, I resided in zone 9b and our last frost date was sometime in December. In lieu of following frost dates, I just knew I was going to be ready to switch from my cooler weather crops to my summer crops, like tomatoes, sometime in early March. So after the holidays passed, in early to mid-January, I would start my tomatoes. Light space wasn’t so much an issue, either, because mild weather gave me the option of just bringing my seedlings in and out of the garage, weather-permitting.
Amend your soil
In order to encourage healthy growth and optimum fruiting, tomatoes (and any other goodies) need a healthy foundation of fertile soil . To get nutrient-rich soil, amendments should be made over time. Amending your soil is basically the process of adding organic components to your native dirt to improve it’s structure, promote adequate drainage and moisture retention, encourage healthy microorganism activity, and increase nutrients. I like to use a few different amendments in my garden soil, including manure, compost, and some store-bought soil amendments for organic gardening—I really like the Espoma line of fertilizers.
Also, contrary to all of the information online, I haven’t personally found dead fish, egg shells, epsom salts, rusty nails, aspirin, or any other weird planting hold additive to work miracles! I don’t recommend any of the above, although you should definitely keep adding egg shells to your compost and, as long as you don’t have any vermin problems, burying your fish carcasses really won’t do much harm over time.
*UPDATE 2020: Since switching to a method of sheet mulching with arborists’ wood chips in the vegetable garden, my soil fertility and structure has improved drastically. The vegetable garden is completely no-till, nowadays. All I do to the soil is apply a 4-6” layer of wood chips as mulch in the spring, and sometimes another layer in late summer/going into winter. The wood chips breakdown and create lovely soil and the tomato plants grow like gangbusters.
Plant out after all risk of frost has passed
This is so key! Tomatoes are warm weather crops, and do not want to be cold. A hard frost will kill them. So even if everyone else on Instagram is planting their tomatoes, you need to make sure you don’t plant yours out until your risk of frost has passed. Again, you can use the Old Farmer’s Almanac website to determine your Average Last Frost Date, as mentioned above, but you should still check your weather forecast for any impending frosts before planting your tomatoes out—it is only an average, after all, and sometimes the weather can be quite unpredictable.
At our last house, the average last frost date fell on May 17th. Last year, however, we had several inches of snowfall on May 25th. As you can imagine, if I had planted my tomatoes out just according to frost dates, they most likely would have died. Instead, I paid attention to night time temperatures and the forecasts, and I didn’t get my tomatoes planted out until after June 1st.
Plant them up to their necks
Planting tomato starts deeply allows for better anchoring of the plants, and better nutrient uptake. When they say “Plant tomatoes up to their necks”, what they mean is to remove the bottom set of leaves, and plant all the way until just above where you removed those leaves. All along the stem, adventitious roots will grow out. More roots lead to more surface area for nutrient and water uptake. Plus, if you live somewhere with extreme heat, having some deeper roots will help keep your plants cool in summer. And overall, the roots are going to keep your plants nicely anchored to the ground, so they can stand tall and strong against forces like wind.
Water deeply and evenly
I cannot stress this enough! It is much better to water tomatoes deeply and less frequently than shallowly everyday. If you just water the top couple inches of soil, then the roots won't be encouraged to really reach down and out. Ideally, you should water slowly so the water soaks in all around the root zone of your tomatoes, and down deeply, to like a foot deep. If you water in this manner, then you will find that it is okay to skip a day or two (or more, depending on your climate & soil) in between watering sessions. Tomatoes do not like to be over-watered or sit with soggy bottoms, so don't water until the soil is fairly dry to a couple inches deep. And also, as with all garden watering, avoid wetting the foliage, especially if you live some place prone to fungal diseases. Water the soil around the root zone, but not the plant itself. When I lived in California, I discovered olla pots for watering. I used the ones from GrowOya and got such beautiful, low-maintenance, crack-free tomatoes. Another great alternative, which I have also used, is slow watering with a drip irrigation system. My favorite method, however, is just hand watering with a hose running at a low pressure. Hand watering is a way for me to spend time in my garden, evaluating all my plants, and it’s almost therapeutic.
Prevention is the best medicine
So many people growing tomatoes, have the same disease problems, year after year. Whether it be a fungal or bacterial infection, the reason the problem is recurring is often because it is soil-borne. You can start with fresh tomato plants each spring, perfectly healthy starts, but if you have fusarium wilt or root-knot nematodes living in your soil, then your healthy starts will eventually be affected. There is no 100% foolproof method for preventing or eradicating these diseases, unless you want to do something very costly and impractical for the home gardener, like Anaerobic Soil Deinfestation, In-ground Soil Steaming, or Solarization, but there are some preventative measures that can be taken to control these pathogens. First and foremost, as aforementioned, I highly recommend planting varieties of tomatoes that are more resistant to certain diseases. For example, if you get Early Blight every year, look for varieties of tomatoes that are resistant to Early Blight—I’ve heard Juliet is a wonderful one! ;) This doesn’t mean that these varieties will be completely immune to Early Blight—it simply means that they will be less likely to succumb to the disease as soon. Some other preventative measures you can take are mulching around the plants to prevent splashback from the soil onto the leaves when you are watering, and keeping any leaves from coming into contact with the ground. Never compost or recycle a diseased plant—throw it away. And when all else fails, here are two organic solutions to some common tomato ailments:
Actinovate
Actinovate is a well-known BioFungicide, which is basically a beneficial bacteria (Streptomyces lydicus) that can be used to eliminate fungal infections in the garden. It naturally occurs in the soil, so when you use it, it's not as if you are putting some strange, foreign bacteria on your crops. You are simply boosting the good bacteria that is already in your soil. Actinovate is found as a water-soluble powder, and it treats a whole slew of tomato (and other crop) diseases. If you have issues every year with some sort of wilt or blight, try applying Actinovate as a preventative measure, before disease settles in. It can be used both as a foliar spray or as a soil drench. I’ve successfully used Actinovate in the past to prevent damping off in my seedlings.
UPDATED 2020—It is a lot more difficult to find reasonably-priced, smaller packages of Actinovate lately. I have only been able to find larger packages, and as a home gardener, a big package isn’t practical. Two other BioControls I have heard good things about, but have no experience using myself are Bonide’s Revitalize and RootShield.
Beneficial Nematodes
Beneficial nematodes are parasitic roundworms, and unlike the bad nematodes that parasitize your plants and their roots, beneficial nematodes parasitize many bad nematodes and pests. I have most often seen nematodes sold as a paste on a sponge. You place the sponge in a watering can, fill with water, agitate the mixture to disperse the nematodes, and then water them in.
Johnny’s Selected Seeds has an awesome comparison chart of different OMRI listed fungicides that can be used for a multitude of plant diseases. Very helpful resource to have, especially if you deal with any sort of fungal problems in your garden like downy mildew, powdery mildew, or damping off. Click HERE to see Johnny’s Selected Seeds Fungicide Chart
Apply periodic doses of fish fertilizer or compost tea
If your tomatoes are planted in healthy soil with lots of healthy microbes, then you won't need much fertilizer or really any of those synthetic fertilizers with a high N-P-K value. A dose of fish fertilizer every couple of weeks will do them well, though—they are hungry plants! I like using Alaska or Neptune’s Harvest Fish Fertilizer. They are stinky but easy to use and your plants will love you! I have also tried using things like worm tea and OMRI listed water-soluble fertilizers, and they seem to work fine, as well.
Mulch
Top dress your tomato plantings with a nice, thick layer of mulch to retain moisture and prevent soil splashback on the plants. As I mentioned earlier, many tomato diseases are soil-borne, so preventing splashback from the soil to the plants helps prevent disease. And, if you use an organic mulch like dead leaves, straw, or arborists’ wood chips, my favorite, over time they will break down and help you build up beautiful soil.
Provide sufficient support
One thing many gardeners fall for are those flimsy metal tomato cages sold for like 5-10 bucks at the big box stores. While they are sold as “tomato cages”, they are often grossly insufficient at supporting a tomato plant—especially one that is indeterminate. Indeterminate tomato plants continue putting out vines and producing fruit all season long. Many of our most beloved heirloom varieties are Indeterminate. Determinate tomato plants, on the other hand, tend to produce one glut of tomatoes around mid-summer, before petering out. These types of tomato plants do not grow as vigorously or get as large, so a store-bought tomato cage might be able to support them. If you are planning on growing Indeterminate tomatoes, however, you will need to come up with a method of giving them better support (unless you have tons of room for them to sprawl all over the place—they are vines, after all!)
I support most of my tomatoes by utilizing a modified pole and weave technique. With this method, I grow each tomato plant, trained to one or two leaders, up an approximately 6 foot tall section of rebar (any sturdy post would work, though). As the tomato plants grow up their poles, I pinch the suckers and secure the leaders to the rebar using segments of garden velcro. As the fruits get larger in size, they get quite heavy—this is where the “weave” comes into play. I have 10 foot tall wooden posts every 6 tomato plants or so, that serve as my anchors. I tie garden twine to one of the end posts, then weave it around each tomato plant, down the the anchor post on the opposite end, and then back. I’ve tried to sketch this for you as best as I can. This method takes time, but it is inexpensive and highly effective. In California, it was the only method I found to successfully support plants that easily grew taller than 10 feet! I kid you not—toward the end of summer, I had to stand on a step stool to weave my tomatoes and to harvest them.

Other methods you can use to support tomatoes include: training them on a trellis using garden twine, buying or making larger cages (cattle panel or concrete remesh work well for this), growing them over an arch trellis or cattle panel arch, or training them up a string trellis.
No space? No problem—tomatoes grow well in containers
Tomatoes can grow well in containers, especially if you get determinate varieties, bush varieties, or dwarf varieties. I have seen many gardeners grow tomatoes in buckets, large planters, and, especially, grow bags. As I mentioned earlier, tomato plants can get very large, so if you are planning on growing tomatoes in containers, I would start with a dwarf tomato variety. Dwarf tomato plants are indeterminate, in that they will fruit all summer long, but the plants stay smaller, 3-5 feet tall. The fruit is standard-sized and many of the varieties available have an excellent heirloom tomato quality to them. If I could only grow things on my back deck, I would definitely grow Dwarf Tomatoes in 10 gallon Smart Pots.


Follow these tips and you will surely be able to grow a beautiful bumper crop of tasty tomatoes come summer time. The kind of tomatoes that instantly transport you to grandpa's porch on a hot day in July, luscious tomato juice dripping down your chin. Tomato perfection!
Do you have any other tomato growing tips? I'd love to hear about them! Share them below in the comment section.